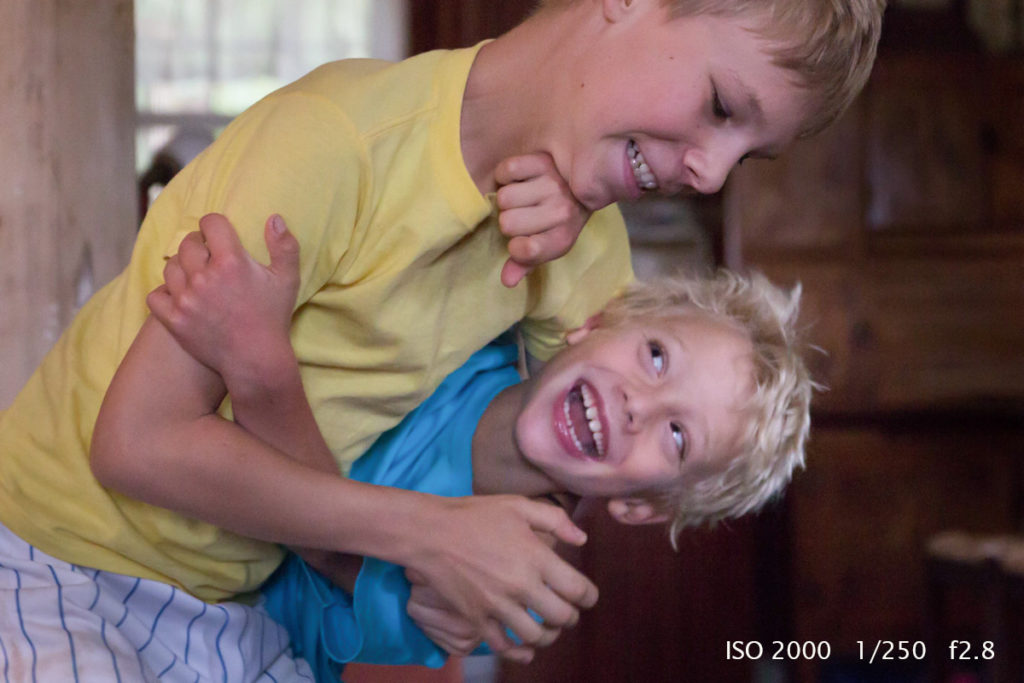
This wonderful shot of my “boys being boys” was taken by Trudy Johnson — one of my GOING MANUAL students who captured this during our FALL FOLIAGE PHOTOGRAPHY WORKSHOP. Anne and I both love this photo! (Want to hear about our next workshop? Click the link at the bottom of this post.)
It’s basketball tournament season and, as it happens, it’s also squirmy kids season. If you think about it, athletes are really just squirmy kids in corporate-sponsored costumes.
By happy coincidence, I can probably help those of you who have never wrapped your heads around getting to the required camera settings for these two notoriously difficult situations. Honestly, I think I have seen more frustration in the sunken eyes of basketball photographers and squirmy kid photographers than any other kind of photographer. They sometimes have a defeated, zombie look about them.
In both circumstances you will be served well by a fast shutter speed to tone down the squirms but exactly how you get yourself to one in the dim light of that poorly lit high school gymnasium or your tastefully lit living room is another matter.
Logic to the rescue. Let’s take it from the top.
Success starts with making your camera really sensitive to light. That means you’re going to turn up the ISO. You want to be in the ISO 1600 to the ISO 3200 range. I would love to be able to tell all of you to go straight to 3200 but some of you own cameras that will start to get quite noisy at that point. (Noise is the digital equivalent of film grain, except that the grain of film was a whole lot sexier than the electronic static looking pixelation of digital noise. Few people rave about digital noise. On the other hand, you can buy Photoshop plugins that will make your pictures look like film grain of the 60’s, 70’s, or 80’s. Take your pick.) So my recommendation is to shoot some test photographs—that’s always my recommendation—to see how your camera behaves at ISO 3200. If you really want to get scientific about it shoot your test photographs in exactly the same lighting conditions you want to shoot your masterpieces.
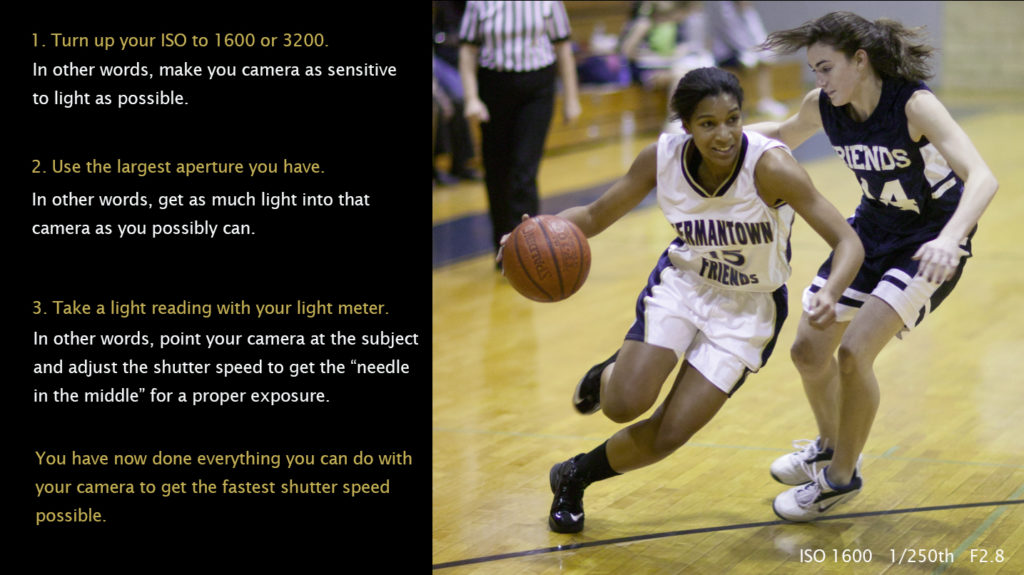
Secondly, you want to get as much light into that now light sensitive camera as possible. There are two ways for you to do that. You can use a long shutter speed or you can use the largest aperture you have. But let’s face it, a long shutter speed is going to turn your squirmy basketball players and squirmy kids into blurry mush and you’re not going to like it. (At least, I don’t think you’ll like it. Some of you might. That’s for another blog.) You have no choice really. Use the largest aperture you have on whatever lens you’re using. The largest aperture is the smallest number.
Finally, you’re going to use the light meter that’s built into your camera to determine exactly what’s the fastest shutter speed you can use with your now set ISO and aperture under the prevailing lighting conditions.
To do that you’re going to take a light reading. That means you’re going to point your camera at your subject (after you’ve turned up the ISO and set your aperture to the smallest number) and adjust your shutter speed to get the indicator needle that’s visible in your viewfinder to zero. (Some cameras have a numerical indicator in there instead of the more common needle. It’s all the same. Zero in light meter world means a proper exposure. Plus numbers mean your picture will be overexposed; negative numbers mean your pictures will be underexposed.) Your light meter is nothing more than a little scientific instrument built into the guts of your camera that says “A little more light, a little less light, almost there, yes, that’s it. Right on the zero! Just enough light for a proper exposure!”
For those of you that can’t hear your light meter talking, you want to get your meter to the zero; not too dark and not too bright.
And for anyone looking for extra credit, I highly recommend you shoot raw. Raw, if you’re willing, will allow you to intentionally underexpose your pictures a little bit to gain an even faster shutter speed. Yes, your pictures will look dark in the camera and when you first open them up on your computer. They’re going to be brightened in editing. But raw can be pretty astounding in adjusting accidentally underexposed—or intentionally underexposed—photographs. It’s a good trick when it works. Whether or not it works has a lot to do with the camera you are using. But, believe me, it’s worth a try.
So how comfortable are you shooting in these circumstances? Do you shoot in RAW? Let me know what challenges you struggle with the comments below.


I need to now practice shooting photos in RAW. I have been taking photos of my oldest and her volleyball team and have had success doing all of the above steps you mentioned but didn’t think about shooting RAW. I will try that and see how it works compared to what I’ve been doing. Thanks!
Shelley, At the risk of tooting my own horn, you are going to thank me for that raw suggestion. You can shoot photographs that are taken with a faster shutter speed – but intentionally underexposed into dark – and then fix them later and the results will be shockingly good. Raw is just amazing. Good luck!
A friend just informed me of your courses and I am hoping to be able to take one very soon. I have granddaughters (13 & 8) that are starting sports. I have a Nikon 5100 camera and lens from 18 to 300. I have been playing around with settings so I am anxious to experiment with the ones you have provided!
Good for you, Barbara. Two athletic granddaughters is a perfect photographic challenge. If you can master that, is pretty much nothing you can’t do photographically. Totally serious. This blog is a excellent start. (If I do say so myself. 🙂
I am completely in need of education to understand my camera and all the lingo. I’m usually using what I shoot on auto. I need expand my horizons! Baby steps. Suggestions?
Well, Robin, we are all about baby steps. it’s impossible for me not to mention right now that we have a new round of courses that are starting today – Monday, March 13. (What else was I going to say? But it’s true! 🙂 honestly, I have done my very best to break down all of this stuff photographic into little digestible pieces. I would take it right from the top and go to the basic photography course. It’s four weeks long and I give you assignments every weekend look at your work whenever you post it. it’s a tried and true method. I’d love to see in class. Seriously, if you’d like to talk to me, I’d be happy to get on the phone with you, too. All the best.
Robin, here’s the link to our courses if you want to check them out. Watch Nick’s brief video to learn more about the different courses and Nick’s approach to teaching. https://www.howtophotographyourlife.com/photography-courses/